
Regulatory Compliance and Safety Standards
OSHA Requirements for Cylinder Storage
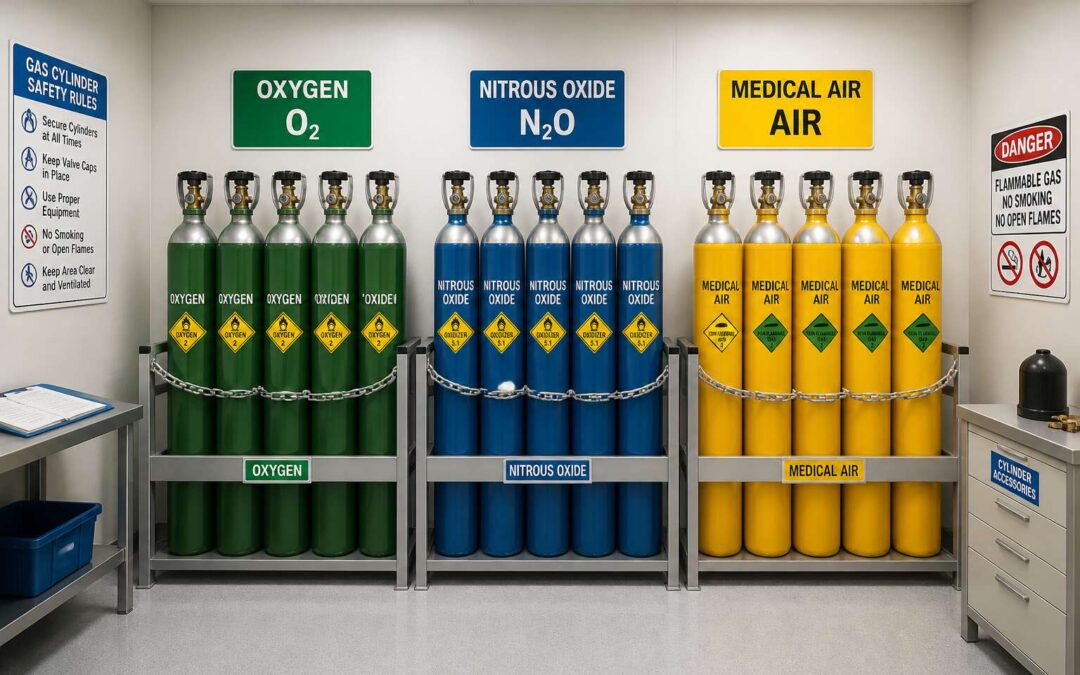
In South Africa, the Occupational Health and Safety Act sets local rules, but OSHA’s requirements for cylinder storage offer a rigorous global baseline. When planning medical gas bottle storage, separation and restraint are non-negotiable. Keep oxygen cylinders at least six feet from flammable gases, or install a noncombustible barrier. Secure every cylinder with chains or straps to prevent tipping. This single step prevents most accidents!
OSHA also mandates specific housekeeping practices. For straightforward compliance, follow these guidelines:
- Separate full and empty cylinders to avoid confusion.
- Inspect valves and caps for damage before storing.
- Post clear signs identifying the contents and hazards.
Ventilation deserves equal attention. The storage room requires consistent airflow to disperse any leaked gas. OSHA demands that valves remain closed and protective caps fitted whenever cylinders are not in use. Without these measures, a tiny leak can turn into a toxic or explosive situation.
NFPA 99 Health Care Facilities Code
Every hospital carries a risk category, even if the medical staff never sees it. NFPA 99 Health Care Facilities Code treats medical gas bottle storage as a matter of patient safety. It assigns each facility a category based on the risk of system failure, shaping how storage rooms are designed, ventilated, and inspected. For South African hospitals, this code complements local regulations.
- Fire resistance ratings for storage areas.
- Independent isolation for each gas zone.
- Regular audits of valves, manifolds, and alarm systems.
What I find compelling is how NFPA 99 forces clarity. It pushes us to ask the blunt questions about capacity, pressure, and equipment readiness. When the code is applied consistently in daily operations, medical gas bottle storage becomes a controlled and predictable part of hospital work.
CGA Guidelines for Medical Gases
The Compressed Gas Association standards operate at a more granular level than facility codes. CGA guidelines govern the physical integrity of the cylinder itself, from the valve stem to the dip tube. The pin-index safety system prevents the accidental connection of a nitrous oxide cylinder to an oxygen outlet. This is the quiet machinery of prevention.
CGA specifications also dictate retesting intervals for high-pressure cylinders. A scavenged cylinder could compromise an entire pipeline. For South African hospitals, CGA compliance dovetails with South African Bureau of Standards requirements for medical gas bottle storage.
- Proper cylinder identification by gas type
- Verification of valve protection caps before transport
- Hydrostatic retesting schedules for seamless steel cylinders
Local Fire Codes and Building Permits
The building inspector does not care about your pin-index safety system. Local fire codes and building permits operate at a different scale. In South Africa, SANS 10400 and municipal bylaws dictate where your medical gas bottle storage may exist, how the room is constructed, and what separates it from the building.
Before pouring a slab, the local authority wants drawings. They want the fire resistance rating of the walls. They want the ventilation path for leaking gas. I have watched hospitals stall over permits for months. Your medical gas bottle storage permit is a documented agreement with the fire department about worst-case scenarios.
- Walls, doors, and floors rated for the specific fire load
- Ventilation outlets positioned to clear heavier-than-air gases
- Clear separation distances from exits and ignition sources
Municipalities vary. What passes in Johannesburg may fail in Cape Town.
Documentation and Audit Readiness
Seventy percent of compliance failures surface during audits, not incidents. The paper trail is where medical gas bottle storage either survives scrutiny or quietly collapses. Authorities rarely ambush you; they review your records first.
Your documentation must prove every cylinder is accounted for. Maintenance logs, staff training records, and inspection certificates form the skeleton of audit readiness. An inspector will ask for the hazard assessment from three years ago. You will produce it, or you will explain its absence.
- Keep delivery and usage logs current
- Retain gas quality certificates per batch
- Record every safety drill and equipment check
Nothing disappears without a trace. The silence of a well kept filing cabinet is the sound of passing an audit, the sound of your medical gas bottle storage dropping off the risk register.
Storage Area Design and Location
Temperature and Climate Control
Where you place your medical gas bottle storage area is as critical as the security you wrap around it. In South Africa, direct sunlight is a persistent adversary, so orientation matters. The area must sit away from high-traffic zones and open flames, with a hard ceiling and a well-drained base. Stagnant air is a hazard; always ensure passive ventilation at both high and low levels. Consider the location carefully:
- Avoid low-lying spots where heavier gases can pool.
- Position the enclosure clear of building air intakes.
- Use a level, non-combustible base.
Temperature control is equally non-negotiable for medical gas bottle storage, as extreme heat accelerates pressure changes inside cylinders. Keep the environment between 10°C and 52°C, and shield the area from radiant heat sources. A simple shaded enclosure often solves the problem. To maintain compliance, log daily temperatures. Also, separate full and empty cylinders to prevent confusion and potential contamination.
Separation of Incompatible Gases
The design of a medical gas bottle storage area is an exercise in foresight. Where you place the enclosure matters, but what you place inside it demands equal scrutiny. Separation of incompatible gases is not a bureaucratic footnote; it is the quiet line between order and hazard. Oxygen and acetylene, for instance, cannot share a corner without inviting catastrophe. The layout must respect the personality of each cylinder.
Consider the physical flow of the space. A wall that separates fuel gases from oxidizers is a simple gesture with profound consequences. I have seen facilities reduce risk by staggering storage zones and colour coding the floor. The separation is not just about distance; it is about clarity for the human hand reaching under stress.
Use this mental checklist when planning the internal arrangement:
– Store oxidizers, like oxygen, away from flammables by at least six metres.
– Keep toxic gases in their own dedicated cages.
– Place empty cylinders in a marked zone, distinct from full ones.
This separation turns a storage room into a sanctuary of predictability. It is a choice made before the emergency, so the mind never has to improvise.
Fire-Resistant Construction Materials
Fire does not negotiate. It respects only the wall you build before the alarm sounds. In South Africa, the location of a medical gas bottle storage area determines how easily a small leak becomes a serious incident. Site the enclosure on solid ground, away from vehicle routes and electrical panels. Keep the approach clear for firefighters. A sealed concrete floor prevents rust and cylinder corrosion.
Fire resistant construction materials matter. A masonry wall with a two hour rating contains heat. Use self closing steel doors and a lightweight roof that could release pressure. Seal every pipe penetration with intumescent caulk. Add a low level vent for heavier gases.
- Face the door outward for quick egress.
- Mark the fire rating on the exterior wall.
- Keep the roof pitched, never flat.
These details define a storage space that performs its duty under duress.
Signage, Lighting, and Accessibility
One in four cylinder related incidents starts with someone opening the wrong door. For medical gas bottle storage, clear signage prevents that error. I once watched a courier circle the same enclosure three times because the label had faded to match the concrete. In South Africa, where campuses sprawl, identification must be explicit.
Effective signage covers three essentials:
- Contents and hazard class
- Emergency contact number
- Authorised personnel names
Lighting matters equally. A well lit entrance reduces fumbling when cylinders are moved at dawn or dusk. Illuminate the path from the delivery bay to the door, and keep the signage lit after hours.
Accessibility means planning for the widest trolley and the tallest cylinder. Keep the route clear of parked vehicles and stacked pallets. Ensure the door swings outward and the lock is standardised.
Handling and Segregation Protocols
Securing Cylinders Against Tipping
One loose cylinder is a domino waiting to fall. A tipped gas bottle can shear its valve and release high pressure gas in seconds, creating a hazard that disrupts the entire facility. That is why every cylinder storage area needs strict handling routines. Each cylinder, full or empty, must be secured to a fixed point before any other task proceeds.
- Stand the cylinder upright on a firm, level surface.
- Attach a chain or strap at two thirds of the cylinder height.
- Ensure the restraint is tight enough to prevent rotation.
- Recheck the setup after each delivery or staff shift change.
Segregation protocols work hand in hand with tipping prevention. Within the medical gas bottle storage zone, group cylinders by gas type and keep distinct gaps between them. This spacing lets staff read labels and valves without bumping adjacent units. A stable, orderly layout reduces accidents and makes every inspection quicker and safer.
Separating Full and Empty Containers
Two similarly sized cylinders stand side by side. One is full, the other empty. In medical gas bottle storage, that visual similarity creates risk. Residual pressure can linger inside an empty tank, making it heavy enough to feel full. A quick glance may send a patient’s oxygen supply to the wrong bay.
The separation protocol demands physical distance. Empty containers move to a designated bay, painted red and marked with locking chains. Full cylinders remain in the green zone. Staff rotate stock using a first in, first out pattern, and they always verify pressure gauges before moving any unit.
This split is not about tidiness. It prevents accidental use of depleted gas during critical procedures. The organized division also speeds up outage checks, letting a technician locate available stock in seconds.
Gas Compatibility and Grouping
A single misidentified cylinder can shut down an entire theatre. That is why handling protocols in medical gas bottle storage rely on more than labels. Every unit is lifted, inspected, and placed according to its gas family. Segregation starts at the receiving bay, where staff sort cylinders by chemical composition and pressure rating. I have watched teams shave minutes off their restocking time simply by respecting these zones.
Grouping is not arbitrary. Oxygen, nitrous oxide, and carbon dioxide each demand their own bay, their own trolley, and their own fittings. A practical way to manage this is to assign each group a distinct colour band and a matching register.
- Oxygen and medical air are stored in the oxidiser bay.
- Nitrous oxide and nitrogen occupy the inert bay.
- Carbon dioxide and entonox sit in the dedicated mixture zone.
This arrangement prevents cross-contamination during rapid restocking, keeping medical gas bottle storage both safe and efficient.
Hazard Labeling and Identification
Some hospital labels look like a toddler fought with a biro. Yet the hazard label remains the stubborn gatekeeper of medical gas bottle storage. When an oxygen cylinder loses its shoulder stamp, the entire bay comes to a halt until a supervisor identifies it by pressure and valve type.
Segregation protocols demand that empty and full units move on separate trolleys. You do not sniff a cylinder to tell which gas it holds. You check the label, then you check the fitting. Two mismatched items mean the cylinder goes to the quarantine cage, no matter how clean it looks.
- Verify the label has not curled.
- Confirm the barcode matches the register.
- Reject any bottle with hand-written notes.
That ritual takes thirty seconds and saves a theatre from a mix-up. Respect the label, and medical gas bottle storage works like a quiet machine.
Manual Handling and Lifting Techniques
Moving a cylinder by its valve cap is a mistake. The valve is the weakest point. In medical gas bottle storage, the hands do the work, but the back and knees must carry the load. Bend at the hips, keep the cylinder upright, and use a trolley with a securing chain for every journey. South African health and safety regulations are clear on this point.
Never drag a cylinder across the floor. Never lift it by the protective cap. Use two people for anything over a certain weight. When you segregate empties from fulls, you also segregate the physical effort. One person, one trolley, one bottle at a time. That discipline keeps the medical gas bottle storage bay safe.
A simple sequence works well for lifting:
- Check the valve cap is secure.
- Tilt the cylinder slightly, slide one hand under the base.
- Use your leg strength to stand, keeping the bottle close to your body.
This routine, repeated daily, protects the spine and the supply.
Leak Response and Spill Containment
Spilled gas creates a silent hazard. Even a slow leak in a busy ward can accumulate into a serious threat, which is why segregation protocols are the first line of defence. In any medical gas bottle storage area, separate full and empty cylinders by a physical barrier. This prevents accidental valve damage from trolley impacts. It also ensures that staff never confuse a spent vessel with a fresh one.
Leak response demands immediate, practiced action. Do not rely on smell; medical oxygen is odourless. Instead, use a soapy water solution on connections to detect bubbles. If a leak is confirmed, isolate the cylinder. Move it outdoors if possible, keeping the bottle upright. Close the valve, then open it briefly to clear residual pressure. Mark the container as faulty. Check the area for ignition sources before returning to service.
- Wear appropriate gloves and eye protection
- Ventilate the enclosed space immediately
- Use a cylinder cart with a chain to remove the leaking unit
- Notify the responsible safety officer within the hour
These steps, when rehearsed monthly, turn panic into procedure. The true tragedy of a careless moment in medical gas bottle storage is not the loss of product, but the trust of a patient who depends on that invisible stream. Protect it with precision.
Maintenance and Inspection Procedures
Routine Visual Inspections
There is a certain poetry in the routine visual inspection, a quiet ritual that keeps the shadows of neglect at bay. For medical gas bottle storage, the eye must wander beyond the obvious, tracing every valve and regulator for subtle traces of corrosion, grease, or the faint hiss that betrays a failing seal.
We check the cylinder bodies for dents, bulges, or rust bloom, especially where paint has chipped. Stamping and labels must remain legible, for they hold the cylinder’s history. A quick survey of the storage area reveals what might otherwise go unnoticed:
- Suspicious odours or moisture accumulation
- Loose fittings or damaged valve protection caps
- Evidence of impact, such as scratched paint or bent guards
Each finding, however small, deserves a note in the daily log. In this discipline, we find neither drama nor embellishment, only the steady assurance that the medical gas bottle storage remains a fortress of safety.
Leak Detection Testing Methods
Leak detection testing is where routine inspections end and investigation begins. A silent leak can escape every daily check, hiding in a threaded joint or behind a valve stem, for months. That reality governs how we handle medical gas bottle storage. We pair electronic detectors, calibrated monthly, with a simple soapy water solution brushed over every connection point. Bubbles reveal what the human nose cannot catch.
For each cylinder, we follow a set order:
- Valve outlet
- Regulator threads
- Pressure relief device
These three points account for most failures. When a leak is suspected, the cylinder is isolated immediately. An electronic sensor detects traces far below human perception.
A portable gas monitor near the storage rack catches escaping gas before it becomes a hazard. The testing cycle repeats every sixty days, and each result is recorded in the operational log. No leak is too small to document.
Valve Protection and Cap Usage
A protective cap left loose is not a minor oversight. It is the first point of failure in the valve assembly, and the entire chain of medical gas bottle storage depends on this component. A valve that is exposed to a single knock from a passing trolley can develop a hairline fracture, invisible to the eye but fatal to the seal. For this reason, every cap must be treated as a piece of safety equipment, not a convenience.
Valve protection is a two part discipline. First, the cap must be secured for transport and for any period when the cylinder is not actively connected to a regulator. Second, the threads on the valve itself require a gloved hand check for dirt, moisture, or burrs. We run through a specific order during each inspection:
1. Confirm the cap is fully threaded and hand tight
2. Inspect the valve threads for debris or damage
3. Check the valve outlet for any signs of corrosion
4. Verify the pressure relief device is intact and free of oil
A cap that will not screw down smoothly is a warning. It means the threads are damaged, and that cylinder must be set aside for professional servicing. There is no place in active medical gas bottle storage for a forced fit or a loose seal. The routine takes two minutes per cylinder, and it prevents the kind of failure that shuts down an entire ward. We treat this process as the baseline, the quiet routine that keeps the system honest. Every thread, every seal, every cap is a small promise that the gas inside stays pure and ready. That is the point of the inspection. The valve is the only exit, and the cap is its guardian.
Cylinder Rotation and Expiry Management
Maintenance and inspection procedures follow a rhythm most staff never notice. Every cylinder in our medical gas bottle storage system carries a traceable history. We record the arrival date, the last test date, and the departure date.
Cylinder rotation demands discipline. The oldest stock moves first, always! We arrange racks so no cylinder sits forgotten against a back wall. Each week, a designated person checks the neck stamps and flags anything within ninety days of retest.
- Clear the area of obstructions before handling new deliveries
- Confirm every cylinder has a legible batch code
- Log any failure into the maintenance register
Expired cylinders do not linger. They move to a quarantine zone, clearly marked, and the supplier receives a return notice within forty eight hours. This prevents one outdated cylinder from ruining a full rack. It seems tedious, but it keeps the entire medical gas bottle storage system honest!
Recordkeeping and Maintenance Logs
Recording the quiet life of a medical gas bottle storage facility is an act of recordkeeping archaeology. The ledger of custody becomes the semantic spine of the operation. Every audit trail begins with a single line entry, a durable witness to the gas that moved through the bays. We document the supplier batch number with exacting care. This is not bureaucratic theatre. It is the only way to reconstruct the story of a cylinder after an incident.
The maintenance log should capture specific data points. We note the date of receipt, the identity of the person who accepted the delivery, and the condition of the valve protection. We include pressure readings on arrival. This baseline data becomes essential when comparing cylinder performance over time. Without it, we are working with ghosts.
A meticulous log also prevents operational amnesia. Staff rotate, but the history remains. We have found it useful to record:
– The unique cylinder serial number
– The date of the last hydrostatic test
– Any visible corrosion or damage
– The date the cylinder left the medical gas bottle storage area
The log is a promise. It proves that the right cylinder, with the right contents, at the right pressure, was in the right place at the right time. That level of proof is invaluable. We treat the record as a physical asset, not a chore. It is the quiet guardrail that keeps the entire system honest.
Staff Training and Emergency Preparedness
Training Frequency and Certification
Every year, inadequate training contributes to preventable incidents in healthcare. For medical gas bottle storage, a prepared team is the final safeguard. Training must be frequent and rigorous, with certification renewed through hands-on assessment, not just online modules.
Emergency drills should occur quarterly, while annual refreshers cover new regulations. Each session should test the ability to identify gas types, secure a leaking cylinder, and execute evacuation protocols. Certification demands documented proficiency, including practical drills and written exams.
A robust program includes:
- Quarterly leak response simulations
- Annual certification reviews
- Monthly spot checks on handling procedures
The weight of responsibility falls on every individual who touches a valve. Their knowledge turns static storage into safe practice. In this discipline, medical gas bottle storage becomes a commitment to those who depend on the system functioning without failure.
Proper Handling and Transport Techniques
Emergency preparedness hinges on muscle memory. In medical gas bottle storage, a sudden hiss or dropped cylinder tests the entire team’s composure. I have watched staff freeze during simulated valve failures, because theory never replaced tactile familiarity. The same applies to transport. Moving cylinders through corridors, lifts, and emergency exits demands both hands and a clear path. Use a dedicated trolley with securing straps.
- Inspect the valve cap before every move
- Confirm the cylinder is upright and chained
- Clear the route of obstructions before lifting
Never drag or roll cylinders on their side. The drill must include a transport failure scenario, since leaking cylinders rarely occur in the storage room alone. Practice isolating a cylinder in a lift or stairwell. That exercise changes how teams view their routes, turning routine transit into a rehearsed procedure.
Emergency Shutdown and Isolation Procedures
Emergency shutdown and isolation procedures should be drilled until they require no thought. When a cylinder begins to leak, the priority is stopping the flow at its source. Every staff member in medical gas bottle storage must know which valve controls which zone. That knowledge saves the time spent reading labels under pressure.
- Identify the leaking cylinder by sound and feel.
- Shut the nearest service valve with a gloved hand.
- Alert the charge nurse and the facilities team.
- Evacuate the immediate area using the designated route.
Rehearse this sequence without visual cues, because alarms often mean darkened corridors. Communication should happen in plain language: name the cylinder size, the zone, and the action taken. That routine makes the isolation response automatic and calm.
First Aid for Gas Exposure Incidents
Statistics show most gas exposure injuries worsen because responders freeze. In medical gas bottle storage, staff must rehearse first aid until the sequence becomes automatic. The invisible plume from a leaking cylinder demands calm, immediate action. Remove the victim from the contaminated zone, but never enter without a respirator. Assess consciousness and breathing before assuming anything. Oxygen displacement produces signs that mimic exhaustion, so do not judge by appearance.
When a cylinder leaks and someone breathes in argon or nitrogen, move them to fresh air. Lay them on their left side if unconscious. Administer oxygen if trained, but only with a clear airway. Monitor vital signs continuously.
- Alert the nearest emergency team first.
- Check the zone for secondary leaks.
- Document exposure details for the attending physician.
First aid is not a replacement for medical evacuation. Every drill in medical gas bottle storage must pair isolation steps with exposure response, because the difference is often seconds.
Evacuation Planning and Drills
Evacuation planning in medical gas bottle storage areas demands more than a posted map. Every second counts when a cylinder ruptures or a regulator fails. Staff should know the nearest exit, the assembly point, and the sound of the alarm. Drills turn written procedures into habit.
- Sound the alarm and shut the door.
- Account for every employee at the assembly point.
- Report missing persons to the response team.
- Never re-enter until the area is declared safe.
Practice this sequence monthly! In medical gas bottle storage, a calm evacuation prevents panic from becoming paralysis.